Do this one thing to save $10 to $20 a week

Recently I have taken a long, hard look at my spending habits and am determined to make some positive changes.  As I was making my shopping list this week, separated into food and nonfood as usual, I had an epiphany.  What if after making my shopping list I looked over it again with a different mindset, looking for something, anything, that I could do without, substitute with something I already had, or make it myself out of what I have on hand?  I know this kind of thinking comes easily to some people, but I had never thought to look at my shopping list with this kind of filter.

And now you’re probably wondering what I managed to mark off my list.  For this particular list I decided not to buy new dishcloths.  I have plenty of old towels that I can cut up to the right size and use.  I glanced at Wal-Mart while I was shopping and for the ones I would have bought, I saved almost $5 for four dishcloths, so if I bought 4 packs, that would be almost $20.  It really makes me like my cut up towel dishcloths so very, very much.  They make me smile.

So now I’m hooked.  Every single list I make, I am going to peruse it with the goal of marking off even one thing that I don’t really need, can get by without, substitute something I already have, or even make it myself with things around the house.  Isn’t this the spirit behind the saying “use it up, wear it out, make do, or do without”?  I’m estimating that by doing this exercise before each shopping trip, I can easily save $10 to $20 a week.  And that is a great amount of money to add to my debt snowball fund!

‘Tis the Season for Venison

It’s that time of year here in Missouri, the time we fill our freezer with the wonderful protein God has provided us in nature…white-tailed deer!  Having grown up in this area, both my husband and I grew up eating deer as a large part of our diet and still love the taste of it.  Since the season is upon us, I thought I would share some of our favorite ways to prepare venison just in case you are blessed with some as well.

deer_forest_whitetail[1]

Photo courtesy of all-free-download.com

Fried Tenderloin Strips

We don’t fry a lot of foods, but we do make an exception for deer tenderloin because it’s just simply divine.  It’s as easy as cutting the tenderloin into thin strips, dredging them in a mixture of flour and whatever spices you like (don’t forget salt and pepper), and sauteing in whatever kind of fat/oil  you prefer.  It only takes a few minutes to cook if you slice it thinly, and it will almost melt in your mouth.  We usually have this with mashed potatoes, biscuits, and gravy made from the pan drippings, but you can make it healthier by adding different sides.  (By the way, if you freeze the tenderloin for 20-30 minutes before slicing, it makes it so much easier to get thin slices.  And be sure to use a super sharp knife that is designed for cutting meat.)

Roast Venison

Probably our second favorite way to prepare venison is to roast it in the Crock-Pot.  This is perfect for those less-than-tender cuts, as anything slow-cooked all day will be falling apart by the time you’re ready to eat it.  Just brown the roast in olive oil (or any kind of oil) in a pan on the stove, then transfer to the Crock-Pot and add any vegetables you like (potatoes, carrots, etc.), and seasonings.  I have used all kinds of seasonings, from store bought packages to tossing in whatever smells good at the time, and really you just can’t go wrong.  If you like your roasts served with gravy, use the juices and make a silky smooth gravy to go over the top.

Substitute for Beef

I don’t think I can write a post on venison without throwing out my favorite way to use it…in place of beef in any recipe!  We process our own venison, which is a polite way of saying we butcher it ourselves, and we do not grind any of it.  Usually the ground venison is so low-fat that you need to add oil to the pan to cook it, unlike the usual ground beef you find at the store.  But it can be used ground as a substitute for any ground beef dish.  We use the roasts, steaks, and loin cuts interchangeably with roasts, steaks, and loin of beef.  For example, one of our favorite meals is stroganoff.  We simply cut up the venison meat into strips and use instead of beef.  Another is beef tips (small pieces of tender meat in a light gravy), but we substitute deer instead of beef.  You get the idea.

It really all boils down to us saving quite a bit of money on meat throughout the year by harvesting what we can during the season we are allowed by law.  We stock the freezer with as much as we can, and then try to evenly stagger out the use of it throughout the year.  Because we process the meat ourselves, we get a high quality protein source at the lowest price available to us.  Sure beats the price of beef that we are seeing in the stores right now!

I’m always interested in new recipes or ways to prepare foods, so let me know your favorite ways to eat venison!

Crock Pot Apple Butter

I found this recipe on a wonderful website, Enchanted Homeschooling (which I also love for her homeschooling info), and fortuitously was given two buckets of apples the very next day, so I made this.  And it was good.

  • Apples, enough to fill slow cooker 3/4 full
  • 1 c white sugar
  • 1 c brown sugar
  • 1/2 tsp nutmeg
  • 1/4 tsp salt
  • 1/4 tsp cloves
  • 1 Tb cinnamon
  • 16 oz apple juice

Place all ingredients in slow cooker and stir to coat apples.  Cook on low for 10 hours.  Once soft and delectable smelling, either mash or run through food processor, depending on how smooth or lumpy you like apple butter.  Place in freezer containers for longer storage, but please put some in the refrigerator to enjoy immediately.

Note:  The original recipe is much more detailed, so you may wish to read over it if you have never made something similar.  She suggested a variety of apples, and this would probably result in an even more flavorful product, but it will still be good if you just use what you have on hand!  Also, she suggests using apple cider for enhanced flavor, but I only had apple juice so I used that.  It was still good, so, again, just use what you have on hand!

Chicken Cacciatore

Do you love Ree Drummond, aka The Pioneer Woman?  Yes, so do I, and I have yet to try one of her recipes that is not amazingly yummy and well-received by my family.  The latest is her Chicken Cacciatore, which I found on her website.

Now, I’m not going to bother retyping that recipe onto this page, but I will send you to her beautiful page where you can get the recipe and even see the gorgeous photos she posted (because you know I don’t take pics of my food yet), and I will also tell you that this is a divine food to prepare for your family.  Or friends.  Or pastor.  Or complete strangers.  I would even cook this for my dog, whom I cook for on a daily basis.

Please take a moment to peruse Ree’s recipe, and I’ll wait here for you.

(Cue Final Jeopardy! music……..)

Great, now let me tell you the two wee changes I made:

1)  I used chicken broth instead of white wine.  Mostly because I haven’t been able to convince myself I like wine (yet) and partly because even if I did like wine, I’m too frugal/cheap to buy it.  Maybe one day that will change.

2)  I added chopped carrots along with the other vegetables.  Hey, I just like carrots, and they felt left out when I took every single vegetable out of the drawer except for them.  Whatev, Carrots!  So into the pot they went.

Cook this and then eat it (and have seconds and eat it again for lunch the next day because it reheats amazingly well) and then let me know what you think and if you made any alterations!

Cinnamon Swirl Pumpkin Coffee Cake

If you love pumpkin (and have almost an entire shelf of it in your freezer like I do), then you must, must, must try this cake.  Every single person that ate this at my house and at church loved it, both kids and adults. picky and non-picky.  As an unexpected surprise, the density of the cake was such that it could be cut into bars and eaten by hand rather than on a plate with a spoon/fork.

Pumpkin Coffee Cake

  • 1-3/4 c all-purpose flour
  • 2 tsp baking powder
  • 1/2 tsp salt
  • 3/4 tsp cinnamon
  • 1 tsp pumpkin pie spice
  • 1/2 c vegetable oil
  • 1/2 c sugar
  • 1 egg
  • 1/2 tsp vanilla
  • 6 oz pumpkin puree (about 1/2 can)
  • 1/2 c milk

Cinnamon Swirl

  • 1/2 c sugar
  • 1 Tb cinnamon
  • 1/4 c unsalted butter (1/2 a stick), melted

Glaze

  • 1-1/2 c powdered sugar
  • 1 Tb milk

Preheat oven to 350.  With a whisk, mix together the flour, baking powder, salt, cinnamon and pumpkin spice.  In a separate bowl, mix the pumpkin, vegetable oil, sugar, egg, milk and vanilla.  Combine all ingredients and mix together until just combined.  Pour batter into an 8×8 cake pan.  Meanwhile, in a small bowl, add melted butter, cinnamon and sugar for the cinnamon swirl.  Drop spoonfuls of the cinnamon mixture on top of the batter.  With a knife, swirl the cinnamon sugar mixture throughout the batter.  Bake 25 to 30 minutes until a toothpick comes out clean.  To make the glaze, mix together the powdered sugar and milk.  Add more milk, if necessary, to get a very thin consistency.  When the cake has cooled some, drizzle the glaze over the top of the cake.

Note:  I went ahead and doubled the recipe so it would use a 9×13 pan.  In doing so, I used an entire can of pumpkin puree, which probably contributed to the awesome density of the cake.  Also, I used a little less sugar in each of the batter, swirl and glaze, and it still tasted sweet enough.

P.S.  One day I will start taking pictures of my food.  I’m usually in too big of a hurry to eat it and can’t be bothered with photos!

Work from home: Medical Transcription

So my “real” job, which I do entirely from home, is medical transcription.  I have done it full-time and part-time and right now I am doing it part-part-time, which means I do it whenever I have extra time.  I trained at home through the Career Step program and found it to be an excellent training program in that I was actually ready and able to go straight to work after going through the program.

This occupation has been a blessing to our family during the times we have needed a second income and has allowed me to be at home with our daughters even while working.  It wasn’t always easy to juggle working 30-40 hours a week along with my mom, wife, and homemaker duties, but it was easier than if I had a job outside the home.

If your budget needs a boost or maybe you would like to learn a skill and find an occupation that you can enjoy and still be home, I highly recommend medical transcription to anyone who likes to listen, type, and correct grammar!  You can find more information on the Career Step program at my affiliate page, and feel free to let me know if you have any questions!

FREE Sleepy Hollow audio book

I am excited to share this audio reading with my daughter during the month of October for some Halloween fun!  Get the audio version FREE today.

Free: The Legend of Sleepy HollowImage courtesy of Amazon.com.

Menu Plan Monday (7/7/14)

I started working full-time from home this last week, and as it’s been well over a year since I have worked 40 hours a week, I knew I needed some help in the evenings with getting dinner ready. So I’m back to menu planning and thought I would share!  I will share recipes and a fun printable with my notes later this week.

Sunday (last night):

Dinner:  Chicken Cacciatore (slow cooker) with pasta and garlic bread

Monday:

Lunch:  Leftovers

Dinner:  Beef & Broccoli (slow cooker) with rice, Pull Apart Oat Rolls and fruit

Tuesday:

Breakfast:  Pumpkin muffins and smoothies

Lunch:  Leftovers

Dinner:  Stuffed shells with sauteed vegetables and leftover rolls

Wednesday:

Breakfast:  Cinnamon Swirl Bread and fruit

Lunch:  Leftovers

Dinner:  Salsa Chicken (slow cooker) with rice, cornbread and a vegetable

Thursday:  Have a dentist trip 2 hours away so an easy meals day.

Breakfast:  Leftover muffins or cinnamon bread or cereal with fruit

Lunch:  Packed lunch for after dentist (sandwiches, chips, fruit and cookies)

Dinner:  Minestrone (slow cooker) and panini-style sandwiches made with Italian bread from bread machine

Friday:

Breakfast:  Breakfast burritos (making extra for freezer)

Lunch:  Leftovers

Dinner:  Salsa Fiesta Chicken, Mediterranean pasta salad and a vegetable

Saturday:

Breakfast:  Yogurt with homemade granola and fruit

Lunch:  Leftovers/sandwiches

Dinner:  Oven-Baked Chicken, mashed potatoes and gravy, vegetable, Make Ahead Butterhorns

Sunday:

Breakfast:  Peanut Butter-Chocolate Chip muffins and smoothies

Lunch:  Leftovers/sandwiches

Dinner:  Twisted Pizza Breadsticks with vegetables, fruit and Peanut Butter Cup cake (slow cooker)


Some stuff I will be making for the freezer or making just for fun include:

  • Breakfast bowls
  • Glazed cinnamon scones
  • Pumpkin crescent rolls
  • Freezer biscuits
  • Pumpkin dog biscuits

Homemade laundry detergent

I remember learning that I could make laundry soap myself and how empowered I felt for having one less item to get at Wal-Mart, which at that time, about 16 years ago, was the only option other than the grocery store in our small town.  Of course after I tracked down the items to make it, I quickly realized that I still had to purchase the ingredients, but after making it over and over, I am happy with how long a batch lasts so it relieves me from adding laundry soap to my shopping list frequently.

When I first started making this, I made the liquid kind and kept it in a big 5-gallon bucket by the washer.  Eventually I tried the powder version, and I prefer it now because it’s super quick and easy to make and can stay in a smaller container but still lasts a long time.

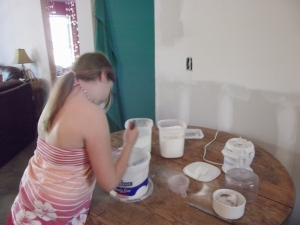
Yesterday, Anna and I made another batch and remembered to take some pictures, so without further ado, here is our homemade laundry detergent tutorial!

001


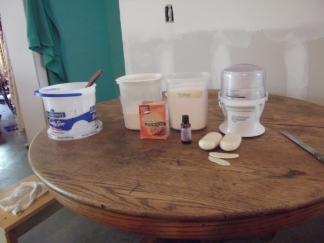
Ingredients and amounts:

  • Bar soap — 1 bar  (Fels Naptha, Zote, any kind you like.  Find the cleaning bars in the laundry detergent and/or cleaning aisle.  I really like Zote but the only kind I had on hand at the time was Tone body soap, so I used that.  Worked fine before so I’m using it again.  It really depends on your preference.)
  • Washing soda — 1 cup  (Also in laundry and/or cleaning aisle.  Only kind I’ve ever seen is Arm & Hammer.)
  • Borax — 1 cup  (Find next to washing soda.  The only brand I’ve found is 20 Mule Team.)
  • Baking soda — up to 1 small box  (Generic is fine, and this is an optional ingredient.)
  • Essential oil of your choice — a few drops  (Also an optional ingredient for a nice aroma.  Sometimes I put it in if I remember to but usually I don’t.)

Tools:

  • Container with lid
  • Spoon for stirring
  • Knife for cutting up bar of soap
  • Grater or food processor
  • Measuring cup

**Note:  All of the tools I use are used exclusively for soap-making, as it’s a real pain to wash them good enough to be put back in the kitchen again.  I keep all of it stashed in an empty cat litter bucket in the laundry room and just pull out the bucket when it’s time to make some.

015


First, I cut up the bars of soap.  I use an old knife that is so old I can’t remember where it came from.  I was blessed with a secondhand mini food processor, so I roughly cut up the bars of soap and toss them into the bowl of the processor.

016

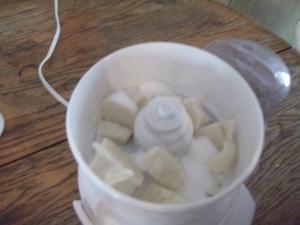
You can also grate the soap, which I used to do and hated.  You want it as fine as possible, which is another reason the processor is so handy.  I toss in a little of the washing soda with the soap so the soap doesn’t gum up in the processor.  It helps make it into a fine powder.

010


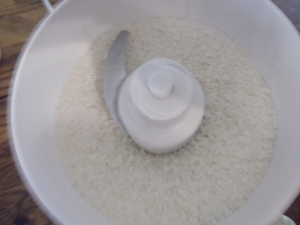
Once it’s finely chopped, toss it into your container and continue until all of the soap is chopped/grated.  This is what it looks like in the food processor bowl:

011

Now it’s time to add the other ingredients.  Add the 1 cup of washing soda,

022


the 1 cup of borax,

024


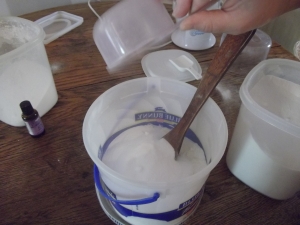
a small box of baking soda (if desired), and enlist the help of the photographer to do the stirring.

026

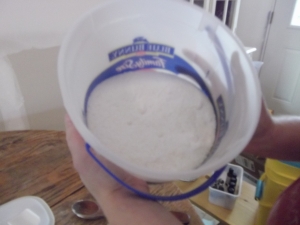
This is what the final product looks like, a finely ground mixture.

029


If you choose to add an essential oil, now is the time.  I used lavender this time.  Just add a few drops (however strong smelling you like) and stir.

030

You are now ready to do some laundry!

032


So let’s do something fun….calculate the cost!  Yep, I’m nerdy like that.  Obviously your cost will differ at least slightly from mine unless you live in my exact area and shop at the exact same places as I do.  It will also vary depending on what brand of bar soap you use.

Bar soap     .50 each

Washing soda     .41 per cup

Borax     .42 per cup

Baking soda     .40 per box

Total for 1 batch = 1.73 (I always make a double batch so this would be $3.46 for a double.)

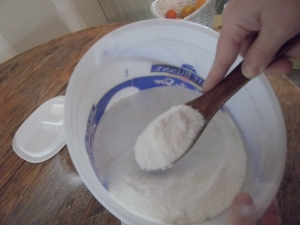
I have a 2-tablespoon scoop that I keep on top of the container to use for measuring.  I use half of the scoop ( 1 tablespoon) for almost all loads and a full scoop (2 tablespoons) for really dirty stuff like my husband’s work clothes and the dog’s blanket.  A double batch makes 37 scoops, which is 74 tablespoons.  Theoretically, I could get 74 loads from this double batch, but more likely I will get about 55 loads.

Cost of laundry soap for my double batch is $3.46 divided by 55 loads = .06 per load.

What a great deal!


Honey-baked chicken

I saw this recipe on the Living on a Dime Facebook page and tried it the same day I found it because I had chicken thighs in the fridge defrosted.  It was super yummy and even my husband, a devout chicken loather, said it was “really good.”  It’s the perfect trio of yummy, easy and affordable.  I’m sure this could be put in the slow cooker as well, but I doubt it will brown up as nicely.

I used bone-in, skin-on chicken thighs and turned them once during the cooking time because my oven has strangely placed rack holders and there isn’t a perfect middle (either closer to heating coils on top or bottom).  I also used Dijon mustard instead of the regular mustard and real butter, as I don’t buy margarine.  Plan to cook something else in the oven alongside and get it started early enough because it does stay in the oven for quite a bit.

Honey-Baked Chicken

6 pieces of chicken

1/3 cup butter, melted

1/3 cup honey

2 Tablespoons mustard

1 teaspoon salt

Place chicken in baking dish, skin side up.  Combine rest of ingredients and pour over chicken.  Bake at 350 for 1 hour and 15 minutes, basting every 15 minutes, until chicken is tender and brown.

Serves 4-6